Are Heat Pumps the Right Choice for Your Home?

Niket Kapur • 31 January 2025

Navigating the Benefits and Challenges of Heat Pump Installation

Heat pumps are increasingly being seen as an alternative to gas and oil-fired boilers. They offer improved energy efficiency, lower carbon emissions, and can integrate well with renewable electricity. However, installing a heat pump - especially in an existing home - requires careful planning.


Heat Pumps in New Homes vs. Retrofitting in Existing Homes


Installing a heat pump in a new build is relatively straightforward, as the system can be designed around it. Space can be allocated for the required hot water storage and external unit, and the heating system can be optimised for the lower water temperatures that heat pumps provide.


In contrast, retrofitting a heat pump into an existing home can be more complex, requiring modifications to accommodate the system. The main considerations include:


• Space for Equipment: Unlike a combi boiler, heat pumps require a separate hot water cylinder.


• Radiator Compatibility: Standard radiators are designed for higher temperatures from gas boilers, so they may need to be upgraded to larger, more efficient models.


• Electrical Supply: Some homes may require an upgraded electricity supply or consumer unit to handle the additional demand.


• Insulation Levels: Heat pumps are most effective in well-insulated homes. If a property loses heat quickly due to poor insulation, the system may struggle to maintain comfortable temperatures.


Location and Noise Considerations


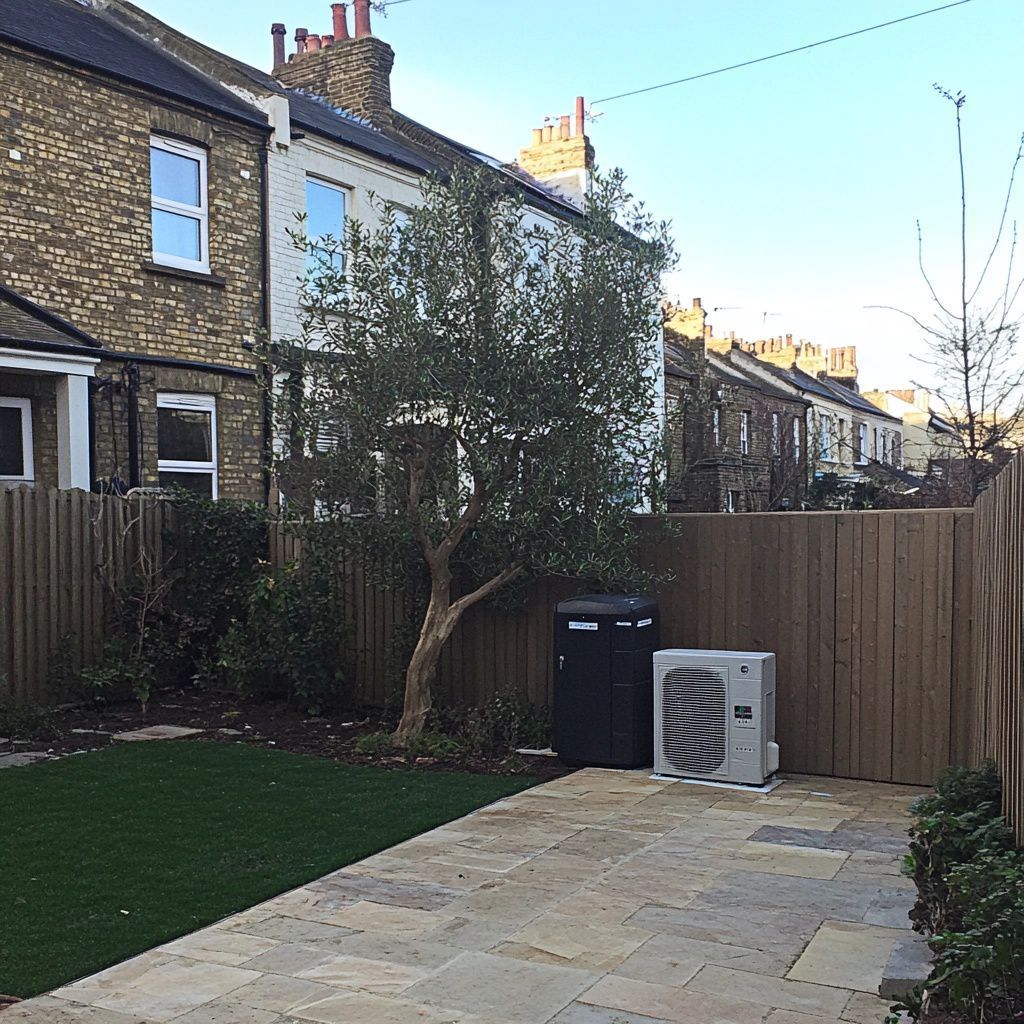
Heat pumps need an external unit, ideally placed near the existing heating system. Considerations include:


• Space Requirements: The external unit needs clearance from walls and surrounding objects for ventilation. If ground space is limited, it may be mounted on a wall or flat roof.


• Noise Levels: While modern units are designed to be quiet, they are not silent. Positioning away from bedrooms or neighbours’ windows can help minimise any disturbance.


How Heat Pumps Work and Their Efficiency


Heat pumps operate at lower temperatures than traditional boilers, typically supplying water at around 45°C rather than 70°C. This means:


• Existing radiators may not provide enough heat output unless they are upsized or replaced with more efficient models.


• Underfloor heating is an ideal match, as it works effectively at lower temperatures.


• Keeping a steady, low-level heat throughout the day is more efficient than turning the system on and off, as fossil fuel boilers allow.


Since heat pumps extract heat from the air, ground, or water, their efficiency varies with outdoor temperatures. A well-insulated home helps to maintain a stable indoor climate and maximises the system’s effectiveness.


Cost Considerations: Installation and Running Costs


Heat pumps are more expensive to install than traditional boilers, though they can offer long-term savings on energy bills. Factors affecting cost include:


• The need for additional insulation or radiator upgrades to improve efficiency.


• Electrical upgrades, if the existing supply is insufficient.


• Installation complexity, which depends on the property’s layout and heating system.


To help offset installation costs, various government grants and incentives may be available, depending on your location. It is worth checking current schemes before making a decision.


Running costs depend on electricity prices, home insulation levels, and how the system is used. Heat pumps work best with a steady heat supply rather than on - demand heating, which can take longer to warm a cold house compared to gas or oil boilers.


Hot Water Considerations


Most heat pumps require a dedicated hot water tank, as they do not provide instant hot water like a combi boiler. If your home currently uses a combi system, you may need to install a separate cylinder, which takes up additional space.


Alternatives such as heat batteries and smart hot water tanks are emerging, offering more efficient ways to store hot water. These innovations help maximise the effectiveness of heat pumps, particularly in smaller homes where space is limited.


Finding the Right Installer


A well-installed heat pump can be highly efficient, but a poor installation can lead to high running costs and underperformance. Key considerations when selecting an installer include:


• Experience with heat pumps and system design (not just boiler replacements).


• Understanding of your home’s specific heating needs.


• Familiarity with insulation improvements to optimise performance.


It is advisable to get multiple quotes and check reviews before committing to an installer.


The Future of Heat Pumps and Energy Management


As electricity grids become greener and more homes integrate renewable energy, heat pumps will likely become a more common heating solution. Some electricity providers already offer variable pricing models, allowing heat pumps to operate when electricity is cheapest. Smart meters and home battery storage can further improve efficiency by shifting energy use to off-peak times.


While heat pumps require a different approach to heating and home management, they are an excellent long-term investment when installed in the right conditions.


Final Thoughts: Is a Heat Pump Right for You?


Before committing to a heat pump, consider the following:


✔ Is your home well insulated, or will it need improvements?

✔ Do you have space for an external unit and hot water storage?

✔ Are you prepared for the different way heat pumps operate?

✔ Have you checked for available grants or incentives?


Heat pumps are not a plug-and-play replacement for a gas boiler, but with careful planning, they offer energy-efficient, low-carbon heating that can reduce running costs over time. If you are considering installing one, seek expert advice to ensure it is the right fit for your home.


Need expert guidance? Whether you are renovating, extending, or looking to upgrade your heating system, we can help you navigate the options, avoid costly mistakes, and get the best value from your investment.


📩 Get in touch today to discuss your project and find the right heating solution for your home!


by Niket Kapur 18 January 2026
A practical, expert-led reference for homeowners who want to understand what "good" really looks like Introduction: How Good Is Your Paint Finish – Really? How good is your paint finish? Do you actually know what to look for? Most homeowners only notice paint when it is obviously wrong: peeling, flaking, or badly discoloured. But the difference between an average paint job and a truly high-quality one lies in subtle details that are easy to miss unless you know what to look for. This guide is designed to change that. Before your next site visit, try this simple exercise: Look closely around light switches, plug sockets, and door frames. Step back and then move closer to the centre of a wall. Stand to one side and let light rake across the surface. Do you see brush marks? Uneven sheen? Slight ripples, ridges, or texture? Do lines at the ceiling feel crisp, or do they wander slightly? These are not accidents. They are the direct result of preparation, materials, tools, and technique. Once you understand what causes them, you begin to see paintwork differently and you begin to appreciate what real quality looks like. 1. Understanding Common Paint Imperfections (What to Look For) Brush Marks and Picture Framing Often visible around switches, sockets, edges, and corners. These occur when: Paint is applied too thickly Poor-quality brushes are used Edges are not blended properly into rolled areas Roller Texture ("Orange Peel") A slightly stippled surface resembling the skin of an orange. Caused by roller nap length, pressure, paint viscosity, and technique Not inherently wrong but undesirable if a glass-smooth finish is expected Lap Marks Visible bands or overlaps where paint has dried unevenly. Caused by not maintaining a "wet edge" Common on large walls and ceilings Flashing Areas that appear patchy or change sheen depending on light angle. Often due to uneven priming or inconsistent paint absorption Wavy or Crooked Ceiling Lines The ceiling and wall may not be straight — but the eye expects them to be. Professionals "create" straight lines visually, even where none exist 2. Surface Preparation: The Foundation of Every Great Finish Excellent paintwork is built, not applied. Cleaning Remove dust, grease, and residue Kitchens and bathrooms often require degreasing Paint sticks poorly to contamination Sanding Walls: light sanding to flatten imperfections Woodwork: progressive sanding (coarse → fine) Always remove dust thoroughly (vacuum + tack cloth) Filling and Repairs Cracks, nail holes, and joints must be filled, sanded, and feathered Poor filling shows through even multiple coats Priming Essential for bare plaster, timber, metal, and stained areas Evens absorption and prevents flashing Specialist primers exist for stains, damp, knots, and metals 3. Paint Types Explained (And When to Use Them) Emulsion Finishes Matt: Hides imperfections, less washable Durable Matt: Better cleanability, modern favourite Eggshell / Satin: Slight sheen, more robust Silk: Reflective, shows imperfections easily Water-Based vs Oil-Based Water-based: Fast drying, low odour, flexible Oil-based: Longer open time, smoother finish, harder wearing (now increasingly replaced by advanced water-based alternatives) Specialist Paints Stain-blocking paints (water marks, nicotine, tannins) Damp-resistant coatings (after moisture issues resolved) Mould-resistant paints (bathrooms, kitchens) High-durability/washable paints (hallways, family homes) 4. Metal Paints and Functional Finishes Radiators and Metalwork Require heat-resistant or metal-specific paints Prevent rust and discolouration Applied thinly to avoid obscuring detail Railings and Exposed Steel Primer + metal topcoat system essential Corrosion protection is as important as appearance 5. Brushes Explained: Why Quality and Type Matter Brush Types Synthetic bristles: Best for water-based paints Natural bristles: Traditionally for oil-based paints Angled (sash) brushes: Precision cutting-in Fine finishing brushes: Doors, trims, cabinetry Why Good Brushes Matter Hold paint evenly Release paint smoothly Reduce visible brush marks Improve edge control Cheap brushes create work. Good brushes create results. 6. Rollers Explained: Nap Length and Finish Quality Nap Length Short nap: Smooth walls, fine finishes Medium nap: General walls and ceilings Long nap: Textured surfaces Foam Rollers Ideal for cabinetry, doors, and ultra-smooth finishes Leave minimal texture Often used to "tip off" after brushing 7. Application Techniques That Separate Average from Excellent Thin, Multiple Coats Thick paint creates ridges and texture Thin coats level better and cure properly Thinning and Diluting Paint Water-based paints can sometimes be lightly diluted Improves flow and levelling Essential for spraying and fine finishing Always follow manufacturer guidance Maintaining a Wet Edge Work methodically Overlap into still-wet paint Prevents lap marks and flashing Sanding Between Coats Light sanding removes dust nibs and imperfections Creates a professional, refined finish 8. Cutting-In and Creating "Straight" Lines Walls and ceilings are rarely straight — but paint lines must appear so. Professional Techniques High-quality angled brush Controlled paint loading Slow, deliberate strokes Visual alignment rather than following the plaster Aids Wide filling knife or paint shield (used carefully) Light sanding of edges between coats This is craftsmanship, not masking tape. 9. Visual Tricks Used by Experienced Decorators Unifying Colour Painting walls and ceilings the same colour in lofts or awkward spaces Reduces visual breaks and enhances perceived space Black Paint for Disappearance Behind radiator covers In shadow gaps Inside pocket-door frames Creates visual depth and invisibility Stripes and Orientation Vertical stripes: Increase perceived height Horizontal stripes: Increase perceived width (Used sparingly in residential settings) Subtle Ceiling Lightening Ceiling slightly lighter than walls for openness Avoids harsh contrast lines 10. Inspection: How Professionals Check Their Own Work • Inspect under natural light • Use raking light or work lamps • Check from multiple angles • Touch up imperfections immediately Paintwork should pass inspection before furniture hides it. 11. A Brief Note on External Paints This article focuses on interior finishes, but it is worth noting that external painting is a specialist discipline in its own right. Exterior paints are designed for: UV resistance Moisture control Temperature movement Algae and mould resistance They require different preparation, systems, and maintenance strategies. Conclusion: Paint as a Craft, Not a Commodity Great paintwork is not about brand names or colours alone. It is the result of: Careful preparation Correct materials The right tools Patience Technique refined over time Once you know what to look for, you will never see paint the same way again — and that is exactly the point. If you're managing a build or renovation and want expert guidance on achieving — and maintaining —professional standards throughout your project, contact The Building Guidance Partnership for a no-obligation consultation at thebgp.co.uk/contact .
by Niket Kapur 17 September 2025
The Assumption Many homeowners feel confident they already have a “good builder.” Often this is someone recommended by friends, family, or colleagues. But what worked for someone else’s project may not suit your project. Builder selection is the single most critical step in any renovation or rebuild. Done carefully, it leads to a smooth build. Done poorly, it can cause budget overruns, stress, and disputes. Why Proper Vetting Matters Most builders are hardworking professionals, but homeowners often don’t carry out the right checks. Some unscrupulous operators may show finished projects or photos that were not their own work. Looking only at glossy, finished results is misleading - poor workmanship can be hidden behind plaster or paint. Without proper vetting, even well-meaning builders can be mismatched to the size, style, or complexity of your project. This is why vetting is not about being suspicious - it’s about protecting your investment and ensuring the builder you choose is the right fit. How to Vet a Builder Properly Look backwards: Review a project the builder completed at least five years ago. Speak to those property owners to see how the work has lasted over time. Look forwards: Visit a current live site. See how it’s managed day to day, how organised it is, and how safety is handled. Speak with current clients: Ask how easy and flexible the builder is to work with. Do they communicate clearly? Are they responsive to changes? Check references: Speak directly with at least two or three previous clients - don’t rely only on written testimonials. Verify insurances: Public liability, employer’s liability, and contract works cover are essential. Verify financial stability: Review the builder’s company structure and trading history. A builder under financial strain poses a risk to your project. Review documents: Are quotes and specifications detailed, or are they vague one-liners? Are they willing to work under a proper written contract? Confirm who does the work: Will the builder’s own team deliver it, or will it be subcontracted to unknown trades? Common Red Flags While most builders are professional, there are signs to be cautious of: Requests for a large deposit before work starts. Vague or one-page quotes with no detail. Reluctance to provide insurance certificates or references. “Too good to be true” pricing. Unwillingness to agree to a clear written contract. These are not criticisms of builders as a whole - they are practical safeguards to avoid risks. Case Study: From Risk to Confidence A homeowner in North London chose a builder based solely on a personal recommendation. The quote was vague, no insurance documents were requested, and the photos shown turned out not to be from the builder’s own projects. Within weeks, disputes arose over extras and workmanship. The BGP stepped in, carried out due diligence, and sourced an alternative builder who was properly insured, experienced, and well-matched to the project. “The BGP's process gave us clarity and confidence. The new builder was organised, insured, and easy to work with - the project turned around completely.” Why Professional Guidance Saves More Than It Costs At The Building Guidance Partnership, we don’t criticise builders - we partner with the right ones. Our due diligence ensures the builder is properly matched to your project. With this approach, homeowners typically save multiples of our fee through: Avoiding inflated extras. Preventing costly delays. Ensuring lasting build quality. Recovering VAT correctly. Reducing disputes with clear specifications and contracts. Take Control of Your Build Selecting the right builder is the single most important decision you’ll make.  Book a free 20-minute consultation with The Building Guidance Partnership today. We’ll help you carry out due diligence, protect your investment, and ensure your project runs smoothly. The Building Guidance Partnership Telephone (020) 8076 3110 WhatsApp +44 7507 705376 www.theBGP.co.uk
by Niket Kapur 14 September 2025
The Temptation Many homeowners are tempted to manage their own building project. The logic seems simple: cut out the cost of a project manager and save money. You already have a builder lined up, maybe one recommended by friends or family, and you feel confident that everything will go smoothly. But while it can work, managing your own build is a serious undertaking. Without preparation, it often leads to stress, delays, and costs spiralling out of control. What Project Management Really Involves Managing a build is not just about choosing finishes or chasing invoices. It requires: Coordinating multiple trades and suppliers. Handling schedules, deliveries, and staged payments. Ensuring compliance with building regulations. Managing risks, safety, and insurances. Keeping accurate specifications, contracts, and records. Even with a good builder, these tasks can overwhelm a homeowner. The Pitfalls to Watch For (Even with a “Good Builder”) Many people believe that because their builder is: “Tried and tested,” or Recommended by friends and family, … everything will go smoothly. Unfortunately, things can still go wrong. Hard to judge quality: Finished projects can look impressive, but hidden corners may have been cut. It is difficult for a homeowner to spot these issues. Knowledge untested: We rigorously test builders’ knowledge. Many homeowners do not - and miss key warning signs. Due diligence matters: We check business history, insurances, and financial standing. This step is often skipped, leaving clients exposed. Technical gaps: Homeowners often lack expertise in dealing with party wall agreements, public liability, and specialist insurances - all of which are critical to staying compliant and protected. The Benefits of Doing It Yourself To be fair, there are reasons why some homeowners still choose to self-manage: Potential savings on professional fees. Personal satisfaction from being hands-on. Full control over decision-making. Direct relationships with trades. For some, this works well - but only when they have time, knowledge, and systems in place. Case Study: From Chaos to Control A homeowner in Harrow decided to manage their own large extension. They trusted a builder recommended by family and assumed things would run smoothly. Within months, delays mounted, trades clashed, and costs increased as “extras” piled up. We were brought in to coach them through the rest of the project. With clear payment schedules, proper contracts, and regular reviews, they regained control. Why Professional Support Pays Off At The Building Guidance Partnership, we provide coaching for homeowners who want to take charge - and full project management when required. Either way, our involvement saves clients far more than our fees. 💡 With professional project management, clients often save multiples of the project management costs through: Better build quality – avoiding mistakes and rework. Preventing inflated builder extras. Reducing timing delays that push up costs. Correctly recovering VAT and council tax where applicable. Avoiding disputes by using clear, pre-agreed specifications and contracts. Take Control - With the Right Support Self-managing a build can be rewarding - but it is not for the faint-hearted. With the right coaching, you can avoid pitfalls, protect your budget, and finish your project with confidence. Book a free 20-minute consultation with The Building Guidance Partnership today. Let us help you decide if project managing your own build is the right choice - and give you the tools to succeed.